Products used:
-MAC Lip Conditioner
-MAC Lip Pencil - 'Cork'
-MAC Lipstick - 'Yash'
-MAC Lipglass
Step 1
- Apply the Lip Conditioner to the lips. Pat dry.
I like to do this on myself and clients before applying lipstick, as it softens and moisturises the lips. Leave it on for at least 2-3 minutes before blotting off. For clients, I always apply before makeup application so by the time I get to the lips, they are super soft!
Step 2
- Overline the lips with 'Cork'. For darker skin tones, you can use 'Stone'.
Outline the lip shape you want to create, using the liner. It's ok if it looks crazy at first as there is no other product on at this point. Try to keep it natural and not too big, as it will be really obvious! You can also add liner again later to perfect the look.
Step 3
- Apply 'Yash' lipstick to the lips.
I like to use a brush to apply lipstick as it gives better control as to where the product is placed. Ensure the most product goes in the middle of the lips and blend towards the edges. With the brush, slightly blend the liner into the lipstick. At this point I like to go back and add more lip liner, to create definition that the blended lipstick may have taken away.
Step 4
- Apply Lipglass on the lips.
My favourite part of the process is adding the Gloss all over, as it blends the products together and makes it less noticeable that the lips have been overlined! I prefer to apply the gloss with a brush also, for better control of where the gloss goes. And that's all there is to it!
Alternative Products
For darker skin tones, use MAC's 'Stone' lip liner.
You can also use PAM Beauty '5262' from the Maq Pro Classic Lip Palette for a slightly pinker lip look.
The NYX Liquid Suede cream lipstick in 'Honeymoon' can be used for a slightly darker look.
Brush used
Bdellium Tools - 714
Extra Tip:
Apply concealer around the lips after, this will help make the lips stand out!
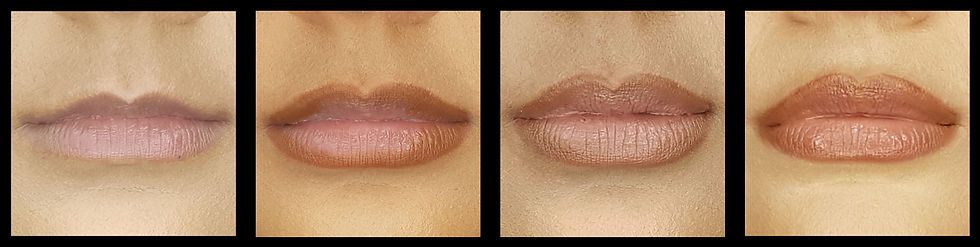
Check out the before and after below!


Comentários